Thứ Ba, 22 tháng 11, 2022

Host is not allowed to connect to this MySQL server


  1. Enable remote connections from the config
  2. Create a new user and allow it to connect to the database server from the specific host (or all hosts)
  3. Flush privileges


Enable Remote connections from MySQL config

Open the MySQL config using your favorite text editor, such as nano. The MySQL file is usually located at /etc/mysql/my.cnf or /etc/my.cnf or /etc/mysql/mysql.conf.d/mysqld.cnf. The location of the MySQL configuration file depends on the version of MySQL you’re using. Check all of these locations to see if you can find the configuration file. Please join our Discord server and let us know if you haven’t found the config file yet. Perhaps we can assist you.

Once found the config file, open it and comment out the line bind-address = 127.0.0.1.

Just add # before the line to comment it out.

# bind-address = 127.0.0.1

Create new MySQL user

We create a mysql user with the host as ‘localhost’ for local use, but when adding a user for remote connections, we must replace the localhost with the IP address of the remote computer.

Login to MySQL as root –

sudo mysql

Or

mysql -u root -p

Depending on the method you select, you will be prompted to enter your password. If you’re using the second method, enter the MySQL root user’s password, or the sudo password if you’re logging in with sudo.

Once in the MySQL command-line, create a new user –

> CREATE USER 'username'@'ip-address' IDENTIFIED BY 'set-password';

You should see the following message if the new user is created –

Query OK, 0 rows affected (0.02 sec)

We will now give the newly created user permissions to manage a specific database on the server. We can also give this user access to all of the databases on the server, but this is not recommended. I recommend that you create a new database(s) for your application(s) and grant this user permissions to manage the database(s).

> GRANT ALL PRIVILEGES ON database_name.* TO 'username'@'ip-address';

Once done, please flush the privileges for the changes to take effect.

> FLUSH PRIVILEGES;

Allow all remote connections

As in the preceding command, I instructed to replace the ip-address with the remote computer’s IP address. Only connections from that remote computer will be permitted. However, we can also use the ‘%’ wildcard to allow all connections, regardless of whether they are from your computer or from that basement guy who needs access to your database for personal reasons. 😉 They will, however, need to enter the correct credentials to access the database.

> GRANT ALL PRIVILEGES ON database_name.* TO 'username'@'%';

If your database server is in production, it is highly recommended to not use ‘%’ wildcard.

Allow connections from a range of IP address

If the remote servers are on the same network, their IP addresses can easily be allowed to allow remote connections without the need for multiple MySQL users.

> GRANT ALL PRIVILEGES ON database_name.* TO 'username'@'172.19.0.*';

Notice how the last octet of the IP address has been replaced with * in the above command. This allows all servers with that IP address to begin with 172.19.0.

Change the MySQL root account password on CentOS7 ( Pass forget)


1. Stop mysql:

sudo systemctl stop mysqld

2. Set the mySQL environment option 
sudo systemctl set-environment MYSQLD_OPTS="--skip-grant-tables"

3. Start mysql usig the options you just set
sudo systemctl start mysqld

4. Login as root
mysql -u root

5. Update the root user password with these mysql commands
mysql> UPDATE mysql.user SET authentication_string = PASSWORD('MyNewPassword')
    -> WHERE User = 'root' AND Host = 'localhost';
mysql> FLUSH PRIVILEGES;
mysql> quit

*** Edit ***
As mentioned my shokulei in the comments, for 5.7.6 and later, you should use 
   mysql> ALTER USER 'root'@'localhost' IDENTIFIED BY 'MyNewPass';
Or you'll get a warning

6. Stop mysql
sudo systemctl stop mysqld

7. Unset the mySQL envitroment option so it starts normally next time
sudo systemctl unset-environment MYSQLD_OPTS

8. Start mysql normally:
sudo systemctl start mysqld

Try to login using your new password:
7. mysql -u root -p

Thứ Bảy, 6 tháng 8, 2022

Kubernetes

Tạo web server Apache trên Linux Cài SSL

Tạo web server Apache

 1. Cấu hình DNS

2. Cài đặt Apache
3. Mở firewall port 80
4. Cấu hình tên miền

NameVirtualHost *:80

{VirtualHost *:80}
    ServerAdmin info@coderhanoi.com
    DocumentRoot /var/www/html/tinhocthatladongian
    ServerName tinhocthatladongian.coderhanoi.com
    {Directory "/var/www/html/tinhocthatladongian"}      
   Order deny,allow
           Allow from all
           AllowOverride All
          Require all granted
   {/Directory}
{/VirtualHost}

Cài SSL miễn phí cho web server Apache trên Linux

Step1: Cài đặt mod ssl cho Apache
yum -y install mod_ssl

Step2:Cài đặt Cài đặt openssl
yum install openssl

Step3: Tạo private key
mkdir -p /etc/httpd/conf/tinhocthatladongian-ssl
cd /etc/httpd/conf/tinhocthatladongian-ssl
openssl genrsa } server.key

Step4: Tiếp theo, tạo file CSR, file CSR này được sử dụng khi cơ quan cấp chứng chỉ cấp chứng chỉ cho máy chủ
openssl req -new -key server.key } server.csr

Step5: Gửi file server.csr ở trên cho nhà cung cấp SSL(nơi bạn muốn mua SSL) bạn sẽ nhận được các file cerfiticate
ví dụn mình dùng sslforfree để thực hành bài này

Step6: Copy các file cerfiticate nhận được vào thư mục /etc/httpd/conf/tinhocthatladongian-ssl và change quyền cho các file này
chown root:root  ca_bundle.crt
chown root:root  certificate.crt
chmod 600  ca_bundle.crt chown 600  certificate.crt


Step7: Cấu hình apache
{VirtualHost _default_:443}
    SSLEngine On
    ServerAdmin info@coderhanoi.com
    DocumentRoot "/var/www/html/tinhocthatladongian/"
    ServerName coderhanoi.com
    SSLCertificateFile "/etc/httpd/conf/tinhocthatladongian-ssl/certificate.crt"
    SSLCertificateChainFile "/etc/httpd/conf/tinhocthatladongian-ssl/ca_bundle.crt"
    SSLCertificateKeyFile "/etc/httpd/conf/tinhocthatladongian-ssl/server.key"
    {Directory "/var/www/html/tinhocthatladongian/"}        
 Order deny,allow        
 Allow from all        
 AllowOverride All        
 Require all granted
   {/Directory}
{/VirtualHost}

Step:  Khởi động lại apache
service restart httpd

Step9:  Mở cổng 443 cho ssl trên firewall

Cách lệnh cơ bản trên Linux


Thứ Ba, 31 tháng 5, 2022

Mảng trong Batch

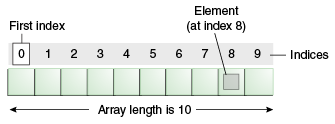
 Mảng là một dẫy các phần tử liền kề nhau, các phần tử được đánh chỉ số (index)  0, 1, 2, ....

Với các ngôn ngữ khác mảng có kích thước cố định. Nhưng trong ngôn ngữ Batch, mảng có kích thước động, và không có thuộc tính mô tả độ dài của mảng (số phần tử của mảng). Và cũng không có hàm (function) nào trực tiếp giúp bạn lấy được số phần tử của một mảng.
Tất cả các phần tử của mảng cần phải được gán giá trị thông qua lệnh set, nếu không phần tử đó không tồn tại.

@echo off
set myarray[0] = Abc
set /A myarray[1] = 234
set myarray[2]=Def

set myarray[0]=A new value
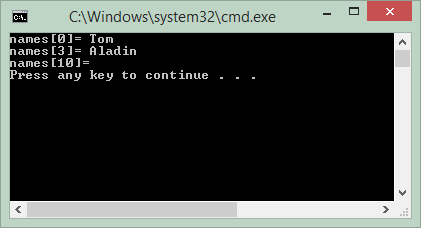
Ví dụ:
arrayExample1.bat

@echo off
set names[0]=Tom
set names[1]=Jerry
set names[2]=Donald
set names[3]=Aladin

echo names[0]= %names[0]%
echo names[3]= %names[3]%

@rem names[10] does not exists!
echo names[10]= %names[10]%
pause
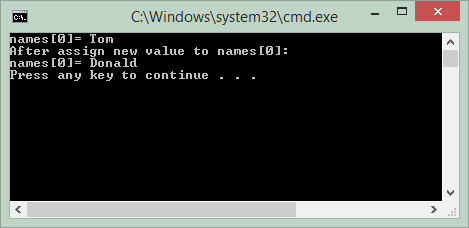
Bạn có thể gán giá trị mới cho các phần tử của mảng, dưới đây là ví dụ:
arrayExample2.bat

@echo off
set names[0]=Tom
set names[1]=Jerry
echo names[0]= %names[0]%

@rem: Assign new value
set names[0]=Donald

echo After assign new value to names[0]:
echo names[0]= %names[0]%
pause

2- Kiểm tra sự tồn tại của một phần tử

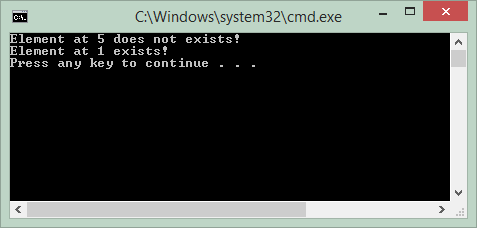
Sử dụng lệnh defined giúp bạn có thể kiểm tra một phần tử trong mảng có tồn tại hay không?
arrayDefinedExample.bat

@echo off
set Arr[0]=1000
set Arr[1]=5000
set Arr[2]=3000

if not defined Arr[5] (
   echo Element at 5 does not exists!
)
if defined Arr[1] (
   echo Element at 1 exists!
)
pause

3- Lặp trên các phần tử của mảng

Vòng lặp For /F có thể duyệt trên một dải số (Range of numbers), vì vậy nó có thể duyệt trên dải các chỉ số của mảng (range of indexes)
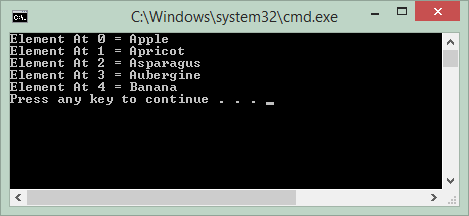
fetchArrayExample1.bat

@echo off
set fruits[0]=Apple
set fruits[1]=Apricot
set fruits[2]=Asparagus
set fruits[3]=Aubergine
set fruits[4]=Banana

FOR /L %%i IN (0 1 4) DO  (
   call echo Element At %%i = %%fruits[%%i]%%
)
pause
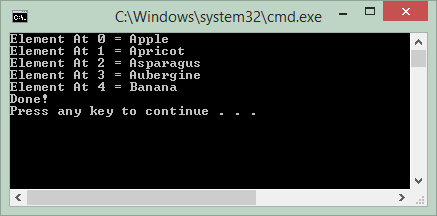
Nếu bạn không biết trước số phần tử của mảng, bạn có thể lặp trên các phần tử của nó bằng cách sử dụng lệnh goto.
fetchArrayExample2.bat

@echo off
set fruits[0]=Apple
set fruits[1]=Apricot
set fruits[2]=Asparagus
set fruits[3]=Aubergine
set fruits[4]=Banana

set /A i = 0
:my_loop 
    if defined fruits[%i%]  (
        call echo Element At %i% = %%fruits[%i%]%%  
        set /a i = %i% + 1
        goto :my_loop
    ) 
echo Done!
pause

4- Phần tử có cấu trúc

Trong ngôn ngữ Batch, phần tử của mảng có thể có một cấu trúc (Structure). Một cấu trúc là một đối tượng có nhiều thuộc tính, chẳng hạn một đối tượng dại diện cho một người với 2 thuộc tính firstNamelastName (Tên, Họ).
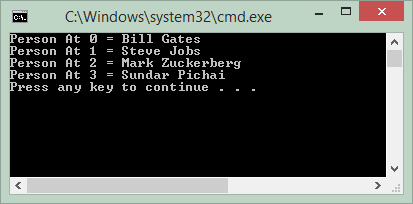
structureArrayExample.bat

@echo off
set persons[0].firstName=Bill
set persons[0].lastName=Gates

set persons[1].firstName=Steve
set persons[1].lastName=Jobs

set persons[2].firstName=Mark
set persons[2].lastName=Zuckerberg 

set persons[3].firstName=Sundar
set persons[3].lastName=Pichai

FOR /L %%i IN (0 1 3) DO  (
   call echo Person At %%i = %%persons[%%i].firstName%% %%persons[%%i].lastName%%
)
pause

Nguồn:
openplanning.net

Vòng lặp trong Batch


1- Tổng quan về vòng lặp trong ngôn ngữ Batch

Các dấu ngăn cách chuẩn (Standard Delimiter).
  • Dấu cách (space)
  • Dấu phẩy ( , )
  • Dấu chấm phẩy ( ; )
  • Dấu TAB

2- Vòng lặp for (Mặc định)

Vòng lặp For (mặc định) của ngôn ngữ Batch được sử dụng để lặp trên một danh sách các file.
Cú pháp:

@rem set_of_files -  Một danh sách các file.
@rem Các file ngăn cách bởi các dấu phân cách chuẩn (standard delimiter)
@rem Tên tham số 'variable' phải là 1 ký tự
FOR %%variable IN ( set_of_files ) DO command

@rem Hoặc:
FOR %%parameter IN ( set_of_files ) DO  (
     command
)
Ví dụ copy một vài file vào một thư mục (Chú ý các file cần copy và thư mục đích cần phải cùng một ổ đĩa).
copyFiles.bat

@echo off
@rem Copy to same Disk

FOR %%f IN (E:\test\file1.data  E:\test\file2.txt) DO  (
   echo Copying %%f
   copy  %%f E:\backup
)pause

Ví dụ khác:

@rem Sử dụng dấu phân cách ( ; )
FOR %%f IN ("E:\my dir\file1.data" ; E:\test\file2.txt) DO copy %%f E:\backup

@rem Sử dụng dấu phân cách ( , )
FOR %%f IN ("E:\my dir\file1.data" , E:\test\file2.txt) DO copy %%f E:\backup

@rem Sử dụng dấu phân cách khoảng trắng
FOR %%f IN ("E:\my dir\file1.data" E:\test\file2.txt) DO copy %%f E:\backup

3- For /R

Vòng lặp FOR /R được sử dụng để lặp trên danh sách các tập tin. Bao gồm cả các tập tin trong các thư mục con, cháu,.. Nó được gọi là vòng lặp đệ quy (Recurse).
Cú pháp:

FOR /R [path] %%variable IN ( set_of_file_filters ) DO command

@rem Hoặc:
FOR /R [path] %%variable IN ( set_of_file_filters ) DO (
   command
)
  • [path] : Tham số này là thư mục gốc. Nếu không có tham số này "thư mục chứa tập tin kịch bản đang thực thi" hoặc "thư mục hiện tại" sẽ được coi là thư mục gốc.
  • set_of_file_filters : Danh sách các bộ lọc file. Ví dụ *.txt , *.bat, ... Hoặc dấu chấm ( . ) nghĩa là tất cả.
  • variable: Là tên biến và phải có 1 ký tự duy nhất.
Ví dụ dưới đây in ra danh sách tất cả các tập tin *.txt hoặc *.log trong thư mục C:/Windows/System32 (Tìm trong cả các thư mục con, cháu,..)
forR_example1.bat

@echo off
FOR /R "C:\Windows\System32" %%f IN (*.txt *.log) DO  (
   echo %%f
)
pause


Ví dụ liệt kê tất cả các tập tin trong thư mục C:/Windows/System32 (Bao gồm các tập tin trong các thư mục con, cháu,...)
forR_example2.bat

@echo off 
FOR /R "C:\Windows\System32" %%f IN ( . ) DO  ( 
   echo %%f
)
pause

4- For /D

Vòng lặp FOR /D được sử dụng để duyệt trên danh sách các thư mục là thư mục con của thư mục hiện tại. 
Cú pháp:

FOR /D [/r] %%variable IN ( set_of_directory_filters ) DO command

@rem Hoặc:
FOR /D [/r] %%parameter IN ( set_of_directory_filters ) DO  (
    command
)
  • set_of_directory_filters : Danh sách các bộ lọc thư mục (directory filter) chẳng hạn en*, fr*,..  ngăn cách nhau bởi dấu phân cách chuẩn (Standard Delimiter).
  • [/r]: Đây là tham số đệ quy (Recurse) và không bắt buộc, nếu có tham số này các thư mục con, cháu,.. sẽ được tham gia vào vòng lặp.
  • variable: Là tên biến và phải có 1 ký tự duy nhất.
Ví dụ: Liệt kê danh sách các thư mục con của thư mục C:/Windows.
forD_example1.bat

@echo off
C:
cd C:/Windows

FOR /D %%d IN ( * ) DO  (
   echo %%d
)
pause
Ví dụ: Liệt kê các thư mục con, cháu của thư mục C:/Windows có tên bắt đầu bởi "en" hoặc "fr"
forD_example2.bat

@echo off
C:
cd C:/Windows

FOR /D /r %%d IN (en* fr*) DO  (
   echo %%d
)
pause


5- For /L

Vòng lặp For /L được sử dụng để duyệt trên một dải các số (range of numbers).
Cú pháp:

FOR /L %%variable IN (start, step, end) DO command

@rem Hoặc:
FOR /L %%variable IN (start, step, end) DO  (
     command
)
  • start: Giá trị đầu tiên của biến
  • step: Sau mỗi bước lặp (iteration) giá trị của biến sẽ được cộng thêm 'step'.
  • end: Giá trị cuối cùng.
Ví dụ:
forL_example1.bat

@echo off 
FOR /L %%d IN (1 2 8 ) DO  (
   echo %%d
)
pause


forL_example2.bat

@echo off 
FOR /L %%d IN (20 -2 5 ) DO  (
   echo %%d
)
pause

6- For /F

Vòng lặp For /F là một vòng lặp phức tạp nhưng đầy sức mạnh. Nó đọc nội dung một tập tin hoặc một vài tập tin. Sau đó phân tích nội dung của các tập tin. Nội dung của một tập tin là một văn bản, nó sẽ được phân tách thành nhiều đoạn văn bản nhỏ, mỗi đoạn văn bản nhỏ được gọi là một Token. Quy tắc mặc định để phân tách văn bản dựa trên các khoảng trắng (white space). Tuy nhiên bạn có thể tùy biến quy tắc phân tách bởi tham số ["delims=xxx"].
Vòng lặp For /F cũng được sử dụng để phân tích nội dung của một chuỗi (string), hoặc để thực thi một tập hợp lệnh.

Cú pháp:

FOR /F ["options"] %%variable IN ( set_of_filenames ) DO command

FOR /F ["options"] %%variable IN ( set_of_filenames ) DO (
     command
)
FOR /F ["options"] %%variable IN ("Text string to process") DO command
FOR /F ["options"] %%variable IN ("Text string to process") DO ( 
     command
)
  • set_of_filenames: Danh sách một hoặc nhiều tập tin.
  • options: Các tùy chọn, ví dụ: "delims=, tokens=1,2,4"
Tùy chọnMô tả
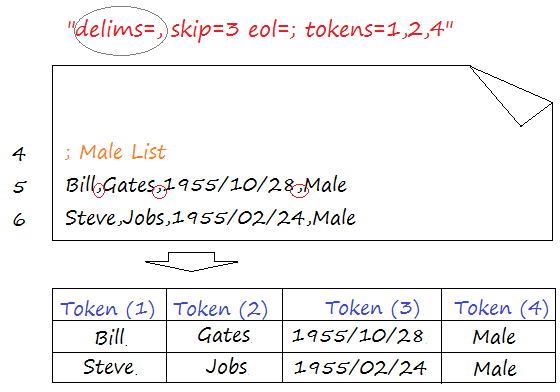
delims=xxxCác ký tự phân cách (delimiter character(s)). Mặc đinh là một khoảng trắng (space)
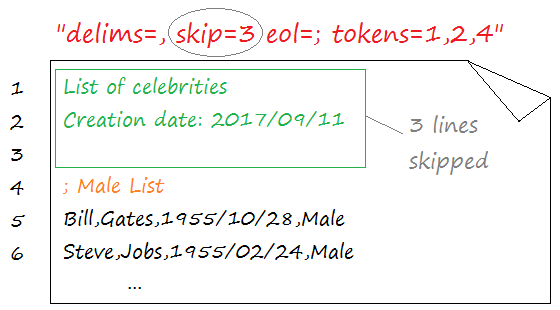
skip=nSố dòng đầu tiên sẽ được bỏ qua trong nội dung của tập tin. Mặc định skip=0
eol=;eol (End of Line): Chỉ định một ký tự đặc biệt, nó được đặt ở đầu một dòng để đánh dấu dòng này là dòng chú thích. Dòng chú thích sẽ bị chương trình bỏ qua. Mặc định là ký tự chấm phẩy ( ; )
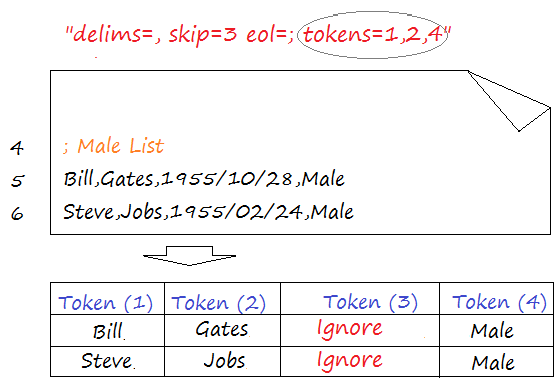
tokens=n1,n2,n3Định nghĩa các vị trí được quan tâm (n1, n2, n3, ..), Mặc định tokens=1
usebackq(Xem thêm giải thích trong các ví dụ)
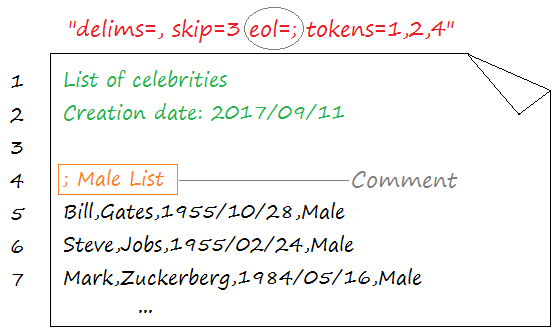
Để dễ hiểu chúng ta hãy phân tích tập tin sau:

eol (End of Line)
eol: Sử dụng để chỉ định một ký tự đặc biệt. Mặc định là ký tự chấm phẩy ( ; ). Nó được đặt tại đầu của một dòng để đánh dấu dòng đó là một chú thích (comment), chương trình sẽ bỏ qua dòng này.
skip=n
skip: Khai báo số dòng đầu tiên của tập tin sẽ bị bỏ qua, chương trình sẽ không phân tích các dòng này. Mặc định skip=0
delims (Delimiter character(s))
delims: Định nghĩa các ký tự ngăn cách (delimiter characters), giúp chương trình phân tách từng dòng văn bản thành các đoạn văn bản con, mỗi đoạn văn bản con được gọi là một Token. Các Token được đánh chỉ số 1, 2, 3, ...
tokens=n1,n2,n3
tokens: Khai báo danh sách các chỉ số được quan tâm, các chỉ số ngăn cách nhau bởi dấu phẩy. Chẳng hạn tokens=1,2,4. Mặc định: tokens=1
TokensMô tả
tokens=1,2,4Các chỉ số 1, 2, 4 được quan tâm.
tokens=2-8Các chỉ số từ 2 đến 8 được quan tâm
tokens=3,*Các chỉ số 3, 4,5, ... được quan tâm
tokens=*Tất cả các chỉ số được quan tâm
Ví dụ "tokens=1,2,4", có nghĩa là chỉ các Token tại vị trí 1, 2, 4 được quan tâm, các Token khác sẽ bị bỏ qua (Ignore).
Ví dụ phân tích tập tin:
Ví dụ sử dụng vòng lặp FOR /F để đọc tập tin persons.txt:
persons.txt

List of celebrities
Creation date: 2017/09/11

; (Comment) Male List
Bill,Gates,1955/10/28,Male
Steve,Jobs,1955/02/24,Male
Mark,Zuckerberg,1984/05/16,Male
Sundar,Pichai,1972/07/12,Male
; (Comment) Female List
Hillary,Clinton,1947/10/26,Female
forF_example1.bat

@echo off 
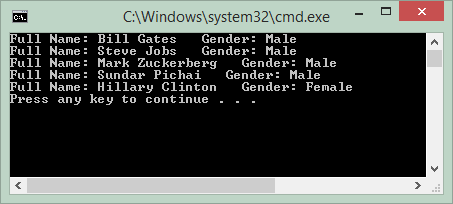
FOR /F "delims=, skip=3 eol=; tokens=1,2,4" %%i IN ( persons.txt ) DO  (
   echo Full Name: %%i %%j   Gender: %%k
)
pause
 
Chú ý: Tên các biến trên vòng lặp chỉ có duy nhất một ký tự.
Biến %%i được khai báo tường minh trên vòng lặp. Các biến %%j%%k là các biến được khai báo không tường minh (Tên của các biến không tường minh là các ký tự kế tiếp của tên biến tường minh).

Nguồn:
openplanning.net


Code by : Truongcom